Let's get started!
Once we understand the concept of vibrato, let's talk about how to acquire a good vibrato step by step. You don't need a bow for this exercise.
Here is one very important thing to remember before we start practicing vibrato.
Keep your left hand relaxed.
This is the first thing we should think about. Good vibrato will never happen if your hand is not relaxed.
How to vibrate - step by step
1. Gain flexibility on the top knuckle of your fingers
You can vibrate from your arm or wrist; that depends on the individual. Either way, we need to learn how to keep the top knuckle of your fingers flexible because the straightening and bending of the knuckle is what will create the bending of the pitch that is necessary for the vibrato.
In this article, I will explain as if we are doing the arm vibrato because the motion of the arm vibrato is bigger than that of the wrist vibrato, and I think it is easier to understand the basic motion of the vibrato this way. Once you understand how it works you can explore the wrist vibrato if you wish.
Here is what we will do to gain flexibility on the knuckles.
Step 0: Place the middle finger on the fingerboard how you would normally in the first position. Make sure that the top knuckle is curved.
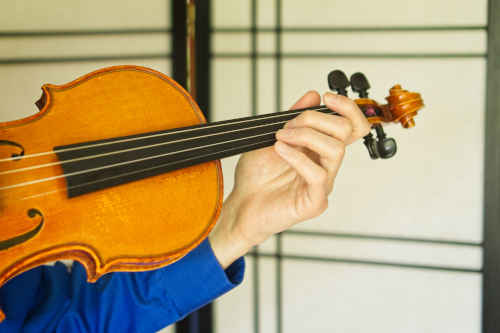
Step 1: Keeping from your elbow to hand straight in line, move your left arm from your elbow as if you were shifting up to the 3rd position, except you will not move your middle finger while your arm goes up. Your arm probably will not actually get to the 3rd position because you have to keep your middle finger in place. At this point, you should notice that your middle finger knuckle is bent as much as it possibly can. What is important here is that this bending of the knuckle should occur naturally because of the movement of your elbow and arm, and not because you are bending it intentionally.
Step 2: Move all the way up to the 3rd position with elbow, arm, and middle finger. Keep the knuckle bent while you are going up.
Step 3: Keeping from your elbow to hand straight in line, move your left arm from your elbow as if you were shifting down to the 1st position, except you will not move your middle finger while your arm goes down. Your arm probably will not actually get to the 1st position because you have to keep your middle finger in place. At this point, you should notice that your middle finger knuckle is completely straight. The straightening of the knuckle should occur naturally because of the movement of your elbow and arm.
Step 4: Move all the way down to the 1st position with elbow, arm, and middle finger. Keep the knuckle straight while you are going down.
Step 5: Repeat from step 1 to step 4 slowly. Stop at the end of each step before you move onto the next. The aim for this exercise is to learn how to bend and straighten the top knuckle of your fingers. However, be careful not to bend and straighten fingers intentionally or forcefully. They should occur simply as a result of the movement of your arm and elbow.
2. Smoother motion of the exercise
Once you can do step 1 through 4 slowly and well we will move onto the next stage.
Combine step 1 and 2 as one upward motion. Then combine step 3 and 4 as one downward motion.
We are still moving our elbow and arm between 1st and 3rd positions and allowing the top knuckle of the finger to bend and straighten. Pause at the end of step 2, also at the end of step 4.
Then practice going upward and downward without any pause. Now your arm should be constantly moving.
3. Limit the travel distance of the middle finger
We are half way there! Now we will practice shortening the distance that the middle finger travels. Keep moving the elbow, arm, and thumb the same as before, but start limiting the distance your middle finger moves. Keep shortening the distance until your middle finger stops moving up and down on the fingerboard while your elbow, arm, and thumb are still moving between the 1st and 3rd positions. The top knuckle of the middle finger should be still bending and straightening.
4. Stop shifting
Once you can keep the middle finger stationary while the knuckle is still bending and straightening, start limiting the motion of shifting from your thumb. Make the motion smaller and smaller until your thumb stops moving. Now, your elbow and arm are still moving, but your thumb is not shifting anymore. The top knuckle should be still flexible here.
Great! Let's move onto How to vibrate, part 2 and we will make this motion we learned into a vibrato!